Help: Maintain user
Overview of the Maintain user process
The administration application provides facilities to manage and edit information of the users. When you log into the application you must have administrator rights. The Admin link is available only to the administrators.
You can reach the Maintain user screen from the following screens:
- Admin Home Dashboard
- User Landing page
- Company users section in the CAM home page
- Company users section in the eCAM home page
Return to top
How do I search for a user?
You can use the search user feature to search for an existing user in the system. Follow the steps detailed below to search for an existing user:
- Log on to the administration application with the helpdesk admin rights.
- Click the link on the left pane of the page. The User screen appears.
- Click the Search user link and select the first name of the user if you want to search for the user by first name from the Search by drop-down list box.
- Select a distributor or business unit from the Distributor/BU name drop-down list box.
- Select the status from the Status drop-down list box.
- Select a sort order from the Sort by drop-down list box.
- Click submit. The User search results screen appears listing all the users matching your search criteria. Click the relevant quick link available on this screen to go to the corresponding screen. The following is a list of quick link icons available on this screen:
 - Click this link to go to the Edit basic user information screen. You can edit basic information of the user using this screen.
 - Click this link to go to the Add user additional accounts screen. You can add additional accounts for the user using this screen.
 - Click this link to go to the Change role screen. You can edit the roles of a user using this screen.
 - Click this link to go to Manage applications and services associated with the user
 - Click this link to go to the Update user status screen. You can update the status of a user using this screen.
 - Click this link to go to the Reset admin password screen. You can reset the password of an admin user using this screen.
 - Click this link to go to the Reset password screen. You can reset the password of a user using this screen.
- Click the User name link to open the Maintain user screen. Click the required link on this screen to go to the corresponding screen.
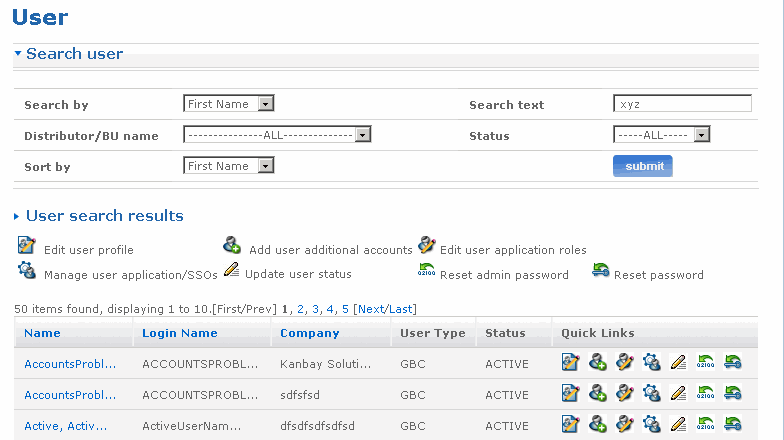
The following is a screen shot of the Search user screen.
Return to top
What can I do in the Maintain user screen?
You can use the Maintain user screen to maintain an existing user in the system. Follow the steps detailed below to search for an existing user and go to the Maintain user screen:
- Log on to the administration application with the helpdesk admin rights.
- Click the User link on the left pane of the page. The User screen appears.
- Click the Search user link and select the first name of the user if you want to search for the user by first name from the Search by drop-down list box.
- Select a distributor or business unit from the Distributor/BU name drop-down list box.
- Select the status from the Status drop-down list box.
- Select a sort order from the Sort by drop-down list box.
- Click submit. The User search results screen appears listing all the users matching your search criteria. Click the relevant quick link available on this screen to go to the corresponding screen.
- Click the User name link to open the Maintain user screen. Click the required link on this screen to go to the corresponding screen.
Given next is the list of sections available on the Maintain user screen.
- Links for user functionalities - Links for user functionality such as Edit user roles, Assign service to user etc are displayed under this section.
Basic user details - Basic user details of the user like login name, user name, user id, user role, user type and email are listed in this section.
- Additional details - Additional details of the user like address, city, state, country etc are displayed in this section. Company details, user's primary and additional accounts with account type are listed in this section.
- Company details - User's primary and additional accounts with account type are listed in this section.
- User services - Services that are assigned to the user are listed in this section.
Given next is a list of links available on the Maintain user screen. The availability of the links is subjected to the logged in users profile such as helpdesk admin, CAM, DAM etc.
- Reset admin password - Use this link to reset the password of an admin user.
- Reset password – Use this link to reset user’s portal password.
- Reset challenge phrase - Use this link to reset user's challenge phrases.
- Edit basic user information - Use this link to edit basic user information details.
- Edit user roles - Use this link to edit user roles.
- Edit user primary account - Use this link to edit user's primary account.
- Update user status - Use this link to update user's status.
- Add user additional account - Use this link to add additional accounts to the user.
- Remove user additional account - Use this link to remove user from the company.
- Manage user bulk load - Use this link to manage user's bulk load.
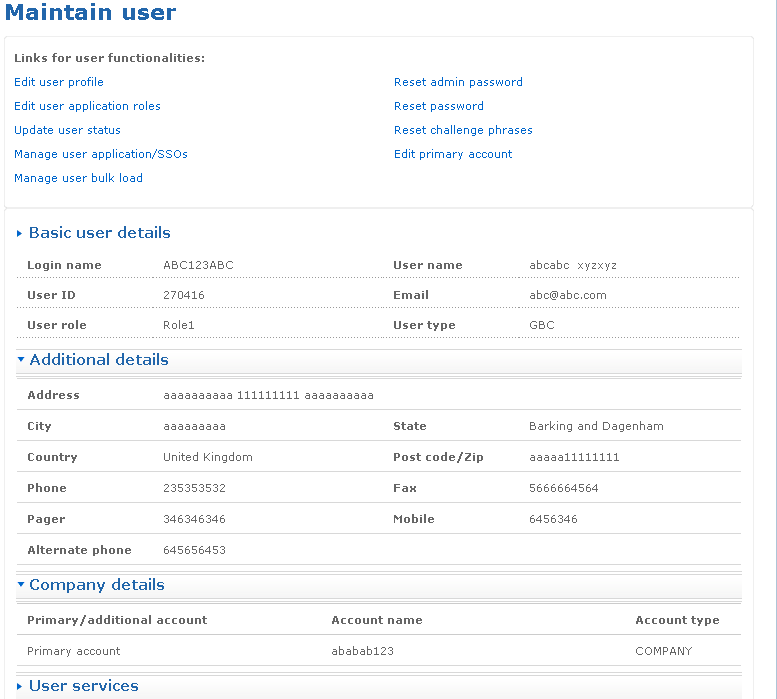
The following is a screen shot of the Maintain user screen.
Return to top
How can I reset the admin password?
The Admin password is used to login to the administration application. The Reset admin password screen allows you to reset the admin password. If any of the searched user roles are not administrative in nature, then the Reset admin password link is not displayed in the Maintain user screen.
The Reset admin password screen contains four sections:
- Basic user details with details of the user like login name, user name, user id, user role, user type and email.
- Additional details with additional details of the user like address, city, state, country etc.
- Company details with user's primary and additional accounts and the account type.
- User services with list of services assigned to the user.
Click on the links to view the details in that section. Follow the steps detailed below to reset the admin password.
- Log on to the administration application with the helpdesk admin rights.
- Click the User link on the left pane of the page. The User screen appears.
- Click the Search user link and select the first name of the user if you want to search for the user by first name from the Search by drop-down list box.
- Select a distributor or business unit from the Distributor/BU name drop-down list box.
- Select the status from the Status drop-down list box.
- Select a sort order from the Sort by drop-down list box.
- Click submit. The User search results screen appears listing all the users matching your search criteria. Click the relevant quick link available on this screen to go to the corresponding screen.
- Click the User name link to open the Maintain user screen.
- Click the Reset admin password link to open the Reset admin password screen.
- The Reset admin password screen contains four sections. The login name, user name, user ID, email, user role and user type of the user is displayed in the Basic user details section of the screen.
- Click on the individual links to view the details of that section.
- Click submit to confirm admin password reset. The admin password is reset and the new password is sent to the user through mail. The mail is sent in the language which was selected while setting up the user profile. The status screen displays confirming the same. The user is prompted to change the password during the next log in.
- Click cancel if you want to cancel the action you are performing on this screen and go back to the Maintain user screen.
The following is a screen shot of the Reset admin password screen.

Return to top
How can I reset the password?
The Reset Password screen allows you to reset the password of the portal. If the searched user is an internal user (CAD) then the Reset password link is not displayed in the Maintain user screen.
The Reset password screen contains four sections:
- Basic user details with details of the user like login name, user name, user id, user role, user type and email.
- Additional details with additional details of the user like address, city, state, country etc.
- Company details with the user's primary and additional accounts and the account type.
- User services with list of services assigned to the user.
Click on the links to view the details in that section. Follow the steps detailed below to reset the password.
- Log on to the administration application with the helpdesk admin rights.
- Click the User link on the left pane of the page. The User screen appears.
- Click the Search user link and select the first name of the user if you want to search for the user by the first name from the Search by drop-down list box.
- Select a distributor or business unit from the Distributor/BU name drop-down list box.
- Select the status from the Status drop-down list box.
- Select a sort order from the Sort by drop-down list box.
- Click submit. The User search results screen appears listing all the users matching your search criteria. Click the relevant quick link available on this screen to go to the corresponding screen.
- Click the User name link to open the Maintain user screen.
- Click the Reset password link to open the Reset passwordscreen.
- The Reset password screen contains four sections. The login name, user name, user ID, email, user role, user type of the user is displayed in the Basic user details section of the screen.
- Click on the individual links to view the details of that section.
- Click submit to confirm the password reset. The password is reset and the new password is sent to the user through mail. The mail is sent in the language which was selected while setting up the user profile.The status screen displays a message confirming the same. The user is prompted to change the password during the next log in.
- Click cancel if you want to cancel the action you are performing on this screen and go back to the Maintain user screen.
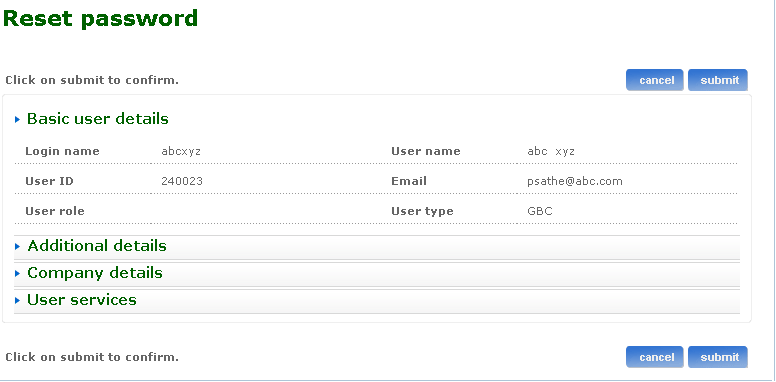
The following is a screen shot of the Reset password screen.
Return to top
How can I reset the challenge phrases?
The Reset challenge phrase screen is a confirmation screen to reset the user's challenge phrases. The Reset challenge phrase screen contains four sections:
- Basic user details with details of the user like login name, user name, user id, user role, user type and email.
- Additional details with additional details of the user like address, city, state, country etc.
- Company details with user's primary and additional accounts and the account type.
- User services with list of services assigned to the user.
Click on the links to view the details in that section. Follow the steps detailed below to reset the challenge phrase.
- Log on to the administration application with the helpdesk admin rights.
- Click the User link on the left pane of the page. The User screen appears.
- Click the Search user link and select the first name of the user if you want to search for the user by first name from the Search by drop-down list box.
- Select a distributor or business unit from the Distributor/BU name drop-down list box.
- Select the status from the Status drop-down list box.
- Select a sort order from the Sort by drop-down list box.
- Click submit. The User search results screen appears listing all the users matching your search criteria.
- Click the User name link to open the Maintain user screen.
- Click the Reset challenge phrase link to open the Reset challenge phrase screen.
- The Reset challenge phrase screen contains four sections. The login name, user name, user ID, email, user role, user type of the user is displayed in the Basic user details section of the screen.
- Click on the individual links to view the details of that section.
- Click submit to confirm the challenge phrase reset. The status screen displays a message confirming the same. The mail is sent in the language which was selected while setting up the user profile. The user is prompted to enter a new challenge phrases during the next log in.
- Click cancel if you want to cancel the action you are performing on this screen and go back to the Maintain user screen.
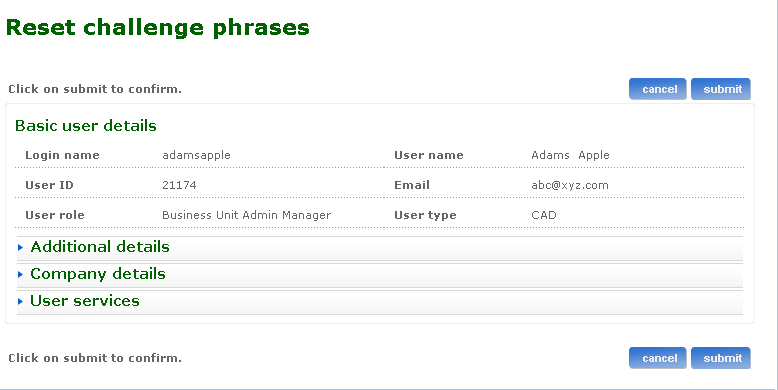
The following is a screen shot of the Reset challenge phrase screen.
Return to top
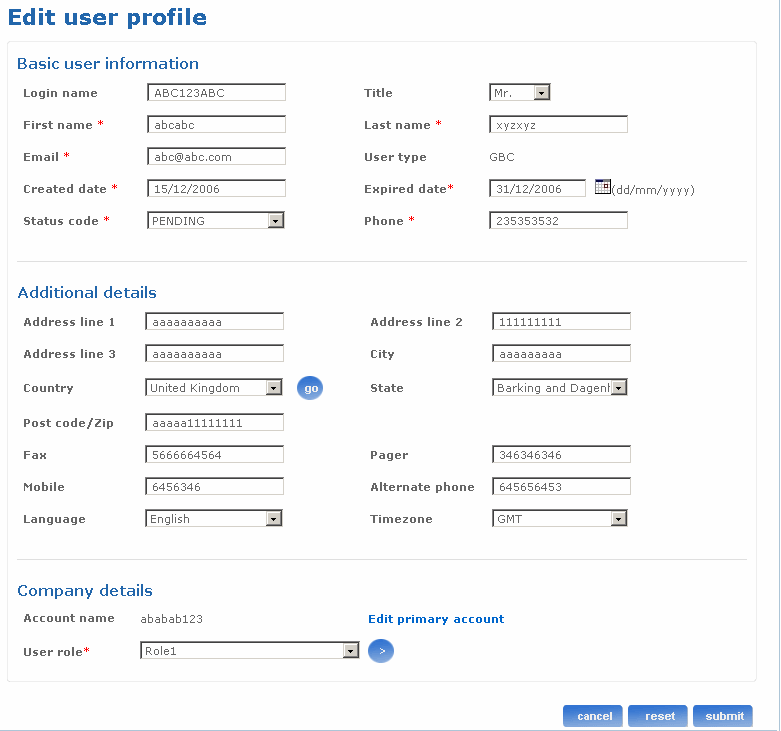
How can I edit user profile?
The Edit basic user information screen is used to edit basic information of the user. All the fields are pre-populated with the values entered during the create user process. You can make changes to the required fields.
Follow the steps detailed below to edit basic information of the user.
- Log on to the administration application with the helpdesk admin rights.
- Click the User link on the left pane of the page. The User screen appears.
- Click the Search user link and select the first name of the user if you want to search for the user by first name from the Search by drop-down list box.
- Select a distributor or business unit from the Distributor/BU name drop-down list box.
- Select the status from the Status drop-down list box.
- Select a sort order from the Sort by drop-down list box.
- Click submit. The User search results screen appears listing all the users matching your search criteria. Click the relevant quick link available on this screen to go to the corresponding screen.
- Click the User name link to open the Maintain user screen.
- Click the Edit basic user information link to open the Edit user screen.
- Login name field is pre-populated and cannot be changed.
- First name, last name and email address of the user can be edited in the appropriate fields.
- User type is a read-only field. Once created user type cannot be changed from internal to external i.e. CAD to GBC and vice versa.
- The Created date field will be pre-populated with the date on which the user account was created in the system. This is a read-only field.
- Type another date when the user details would get expired in the Expired date field. Alternatively, click the calendar icon and select a date.
- Select the status of the user from the Status code drop-down list box to change the status of the user. Depending on the current status (active, contact, deleted, etc.) and the type (internal external) of the user limited options will be available in this drop-down. You cannot change the status for external contact type users, whereas internal contact type users can be made portal users by changing their status. If the internal contact user’s status is changed to active, automatically other links will be enabled for that user on the Maintain users page. Using these links user profile can be setup. Address details sections facilitates modification of user address, phone number etc.
- The user's primary account is displayed as a label. It can be changed using the Edit primary account link. If the user account is changed, associated applications and users services are also updated.
- Select another role from the User role drop-down list box. For external users Helpdesk, CAM & DAM roles are not available in the drop-down. If the user’s role is changed from normal user to an admin user, the admin password is generated and sent to the user in a mail. Delegated admin check box is displayed only for external normal users. Administrators and internal users cannot be made as delegated administrators.
- Select a different language from the Language drop-down list box. The language selected here is used to set the locale when the user logs into the portal. All email communication that happens with the user would be in the selected language.
- Select a different time zone from the Time zone drop-down list box.
- Click cancel if you want to cancel the action you are performing on this screen and go back to the Maintain user screen.
- Click reset if you want to reset the fields to the original values.
- Click submit to edit the basic user information. The User edited status screen appears displaying the message that the user data has been edited successfully. Click on the Maintain user page link to continue.
The following is a screen shot of the Edit user profile screen.
Return to top
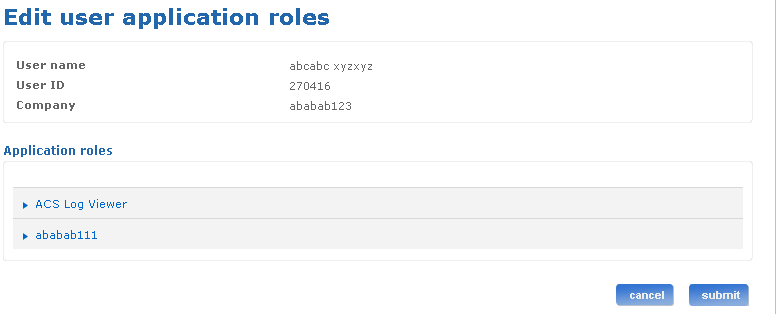
How can I edit user application roles?
The Edit roles screen is used to edit user's application roles. All the fields are pre-populated with the values entered during the create user process. You can make changes to the required fields.
Follow the steps detailed below to edit basic information of the user.
- Log on to the administration application with the helpdesk admin rights.
- Click the User link on the left pane of the page. The User screen appears.
- Click the Search user link and select the first name of the user if you want to search for the user by first name from the Search by drop-down list box.
- Select a distributor or business unit from the Distributor/BU name drop-down list box.
- Select the status from the Status drop-down list box.
- Select a sort order from the Sort by drop-down list box.
- Click submit. The User search results screen appears listing all the users matching your search criteria. Click the relevant quick link available on this screen to go to the corresponding screen.
- Click the User name link to open the Maintain user screen.
- Click the Edit user roles link to open the Edit roles screen. If the user is an internal user (CAD) then the company name will be a drop-down which will be populated with all the accounts of the user. If the user is an external user (GBC) the company name will be a label with the user's primary account name. An external user cannot hold additional accounts.
- Select different accounts from the company drop-down list box. Accordingly the roles get displayed under the applications. Edit user roles page can be used to assign new roles (by selecting the check box) or delete assigned roles (by clearing the check box against a role). The user's primary account is set to 'selected' by default in the Company drop-down list box and roles are displayed under the applications (Application that are under the selected account). The check box against a role is selected if the role is assigned to the user or the role is a default account role.
- Click cancel if you want to cancel the action you are performing on this screen and go back to the Maintain user screen.
- Click reset if you want to reset the fields to the original values.
- Click submit to edit the user roles. The Roles changed statusscreen appears displaying the message that the roles for the user have been changed successfully. Click on the Maintain user pagelink to continue.
The following is a screen shot of the Edit user application roles screen.
Return to top
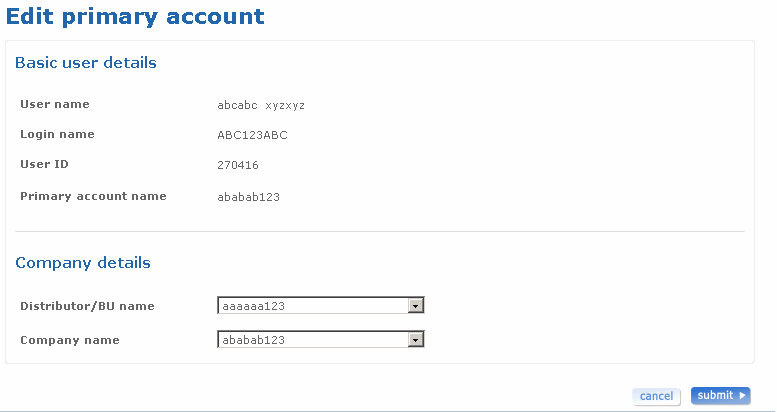
How can I edit the primary account of the user?
The Edit user primary account screen is used to edit the user's primary account.
Follow the steps detailed below to edit user primary account.
- Log on to the administration application with the helpdesk admin rights.
- Click the User link on the left pane of the page. The User screen appears.
- Click the Search user link and select the first name of the user if you want to search for the user by first name from the Search by drop-down list box.
- Select a distributor or business unit from the Distributor/BU name drop-down list box.
- Select the status from the Status drop-down list box.
- Select a sort order from the Sort by drop-down list box.
- Click submit. The User search results screen appears listing all the users matching your search criteria.
- Click the User name link to open the Maintain user screen.
- Click the Edit user primary account link to open the Edit user primary account screen.
- The user name, login name, user ID and primary account name of the user that has been created in the Create user details screen are displayed here.
- Select distributor name from theDistributor name drop-down list box.
- Select company name from the Company namedrop-down list box. This list box gets populated based on the selected distributor name. The message "Company is not found for this distributor" is displayed if there is no company available for the selected distributor. Once the primary account of user is changed, associated applications and services are also updated.
- Click submit to edit the primary account of the user. The User primary account edit status screen appears displaying the message that the user primary account has been edited successfully.
- Click cancel if you want to cancel the action you are performing on this screen and go back to the Maintain user screen.
The following is a screen shot of the Edit primary account screen.
Return to top
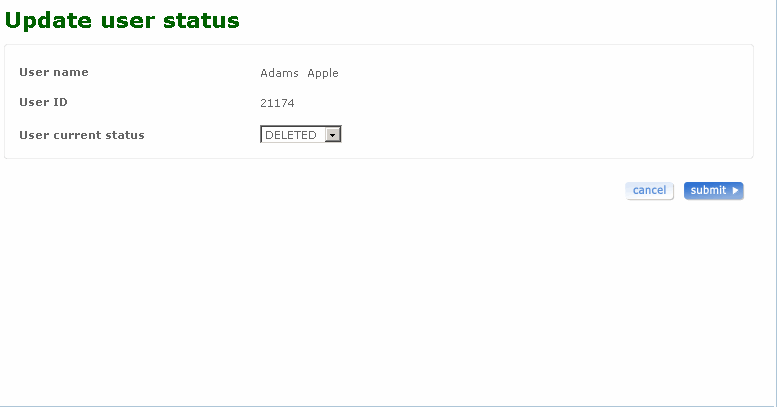
How can I update the user status?
The Update user status screen is used to update the user status.
Follow the steps detailed below to update the user status.
- Log on to the administration application with the helpdesk admin rights.
- Click the User link on the left pane of the page. The User screen appears.
- Click the Search user link and select the first name of the user if you want to search for the user by first name from the Search by drop-down list box.
- Select a distributor or business unit from the Distributor/BU name drop-down list box.
- Select the status from the Status drop-down list box.
- Select a sort order from the Sort by drop-down list box.
- Click submit. The User search results screen appears listing all the users matching your search criteria. Click the relevant quick link available on this screen to go to the corresponding screen.
- Click the User name link to open the Maintain user screen.
- Click the Update user status link to change the user status. The Update user status screen appears. The user name and user ID of the user that has been created in the Create user details screen are displayed here.
- Select another status for the user from the User current status drop-down list box. The user current status and the new status should not be the same. A message appears prompting you to select a different status code than the users current status before submitting in case the user's new status is the same as the current status. Depending on the current status (active, contact, deleted, etc.) and the type (internal external) of the user limited options will be available in this drop-down. You cannot change the status for external contact type users, whereas internal contact type users can be made portal users by changing their status.
- The Password expiry date field displays the password expiry date giving information about the date on which the user password expires. This field is shown only if the current or the newly selected status is active and user type is GBC that is an external user.
- Click submit to change the current status of the user. The User status updated screen appears displaying the message that the user status has been updated successfully.
- Click cancel if you want to cancel the action you are performing on this screen and go back to the Maintain user screen.
The following is a screen shot of the Update user status screen.
Return to top
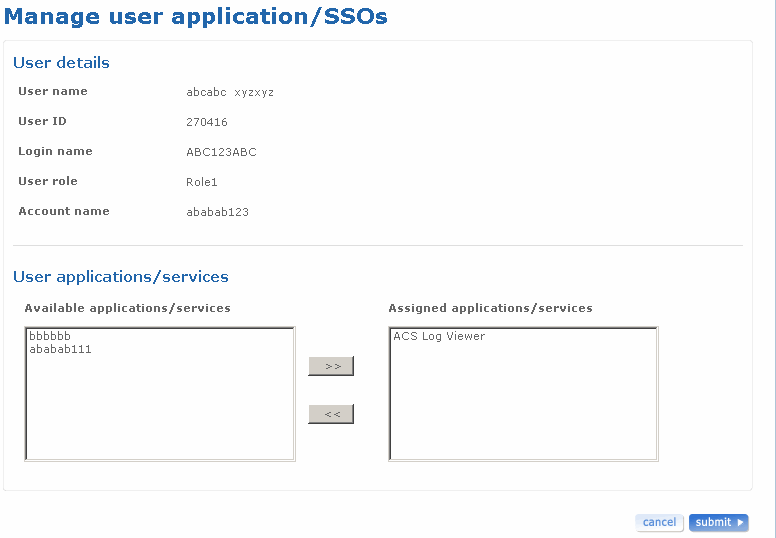
How can I manage user applications and SSOs?
The Manage user application/SSOs screen is used to manage user applications or SSOs. The services that are displayed in these list boxes are not specific to a particular account, but these are services of all the user accounts.
Follow the steps detailed below to manage user application or SSOs.
- Log on to the administration application with helpdesk admin rights.
- Click the User link on the left pane of the page. The User screen appears.
- Click the Search user link and select the first name of the user if you want to search for the user by first name from the Search by drop-down list box.
- Select a distributor or business unit from the Distributor/BU name drop-down list box.
- Select the status from the Status drop-down list box.
- Select a sort order from the Sort by drop-down list box.
- Click submit. The User search results screen appears listing all the users matching your search criteria. Click the relevant quick link available on this screen to go to the corresponding screen.
- Click the Manage user application/SSOs link. The Manage user application/SSOs screen appears. The user name, user ID, login name and user role of the user that has been created in the Create user details screen are displayed here.
- Select another account name from the Account name drop-down list box to change the account name. The account name selected during create user process is displayed.
- The services that are shown in the Link Services list are:
- Applications of type portlet that are assigned to the user and status is Inactive.
- Applications of SSO auth type “user applications hold credentials” or “if not user applications then account applications” are by default displayed in this list. If these applications are already assigned to the user then the status should not be Active or Pending.
- Services that are already assigned to the user with status other than Active or Pending.
- The services that are shown in the Assigned services list are:
- Applications of type portlet are by default displayed in this list. If applications of type portlet exist for the user then the status should not be Inactive.
- Applications of SSO auth type “application details hold SSO credentials” or “account applications holds SSO credentials” are by default displayed in this list. If these applications exist for the user then the status should not be Inactive.
- Services that are already assigned to the user with status Active or Pending.
- Select an application or service from the Available applications/services table and click >> to add the selected application or service to the Assigned applications/services table.
- Select an assigned application or service from the Assigned applications/services table and click << to move the selected application/service to the Available applications/services table.
- Click submit. If the Assigned services list contains at least one service whose SSO auth type is “user applications hold credentials” or “if not user applications then account applications” then the Add SSO details screen is displayed. Otherwise, Manage user SSOs status screen is displayed. These screens are displayed only if the logged in user is a help desk admin.
- The Add SSO Details screen has a list of applications with a provision to enter SSO details for each of the applications. The admin needs to provide credentials to activate the application for the user. If credentials are not provided the application is assigned to the user but in pending status.
- Click cancel if you want to cancel the action you are performing on this screen and go back to the Maintain user screen.
The following is a screen shot of the Manage user application/SSOs screen.
Return to top
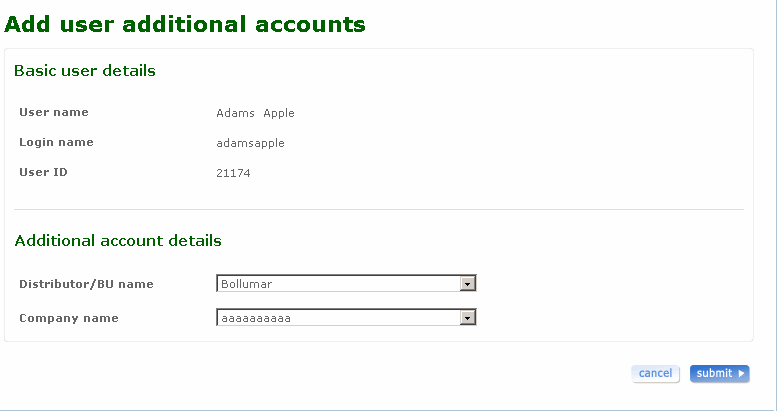
How can I add additional accounts to the user?
The Add user additional accounts screen is used to add additional accounts to the user. This link is available only for internal users. External users cannot be assigned to more than one account.
Follow the steps detailed below to add an additional account to the user.
- Log on to the administrator application with the helpdesk admin rights.
- Click the user link on the left pane of the page. The User screen appears.
- Click the Search user link and select the first name of the user if you want to search for the user by first name from the Search By drop-down list box.
- Select a distributor or business unit from the Distributor/BU name drop-down list box.
- Select the status from the Status drop-down list box.
- Select a sort order from the Sort By drop-down list box.
- Click submit. The User Search Results screen appears listing all the users matching your search criteria. Click the relevant quick link icon available on this screen to go to the corresponding screen.
- Click the User name link to open theMaintain user screen.
- Click the Add user additional accounts link to add additional accounts to the user. The Add user additional accountsscreen appears. Basic user details of the user like login name, user name and user id are listed in the Basic user details section of the screen.
- Select a different distributor from the Distributor name drop-down list box. The drop-down list consists of all the distributors existing in the system.
- Select a different company from the Company name drop-down list. Depending upon the selected distributor, the Company drop-down list gets populated. Even a distributor can be assigned as an additional account to the user. To do this, select a distributor from distributor drop-down and select Select from the list in the Company drop-down. If the newly selected company is already a user account then a message is displayed that the user account already exists for the company.
- Click cancel if you want to return to the Maintain user screen without adding any additional accounts to the user.
- Click submit to add the account to the user. The User add status screen appears displaying the message that the account has been added successfully.
The following is a screen shot of the Add user additional accounts screen.
Return to top
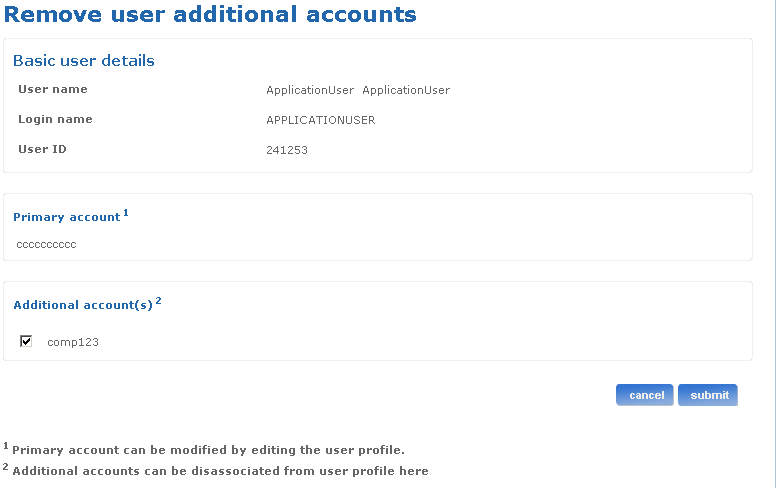
How can I remove an additional account of the user?
The remove user additional account screen is used to disassociate additional accounts from a user profile. This link is available only for internal users. External users cannot have more than one accounts associated with them.
Follow the steps detailed below to remove user additional account.
- Log on to the administration application with the helpdesk admin rights.
- Click the User link on the left pane of the page. The User screen appears.
- Click the Search user link and select the first name of the user if you want to search for the user by first name from the Search by drop-down list box.
- Select a distributor or business unit from the Distributor/BU name drop-down list box.
- Select the status from the Status drop-down list box.
- Select a sort order from the Sort by drop-down list box.
- Click submit. The User search results screen appears listing all the users matching your search criteria.
- Click the User name link to open the Maintain user screen.
- Click the Remove user additional account link to disassociate additional account from user profile. The Remove user additional account screen appears. The user name, login name and user ID of the user are displayed in the Basic user details section of the screen. The primary account of the user is displayed. The primary account can be modified by editing the user profile.
- Select the check box against Additional accounts to disassociate them from the user profile. Any number of accounts can be selected at a given time.
- Click cancel if you want to cancel the action you are performing on this screen and go back to the Maintain user screen.
- Click submit to remove the additional accounts. Validation error occurs when no company is selected from which the user should be removed and submitted. If all the validations are successful then the user is removed from the selected accounts and the status screen displays the message that the user account was deleted successfully.
The following is a screen shot of the Remove user additional account screen.
Return to top
How can I manage user bulk load?
The Manage user bulk load screen is used to view the count of the pending uploads and failed uploads as well as to search for a file uploaded by the user.
Follow the steps detailed below to manage the bulk load task.
- Log on to the administration application with the helpdesk admin rights.
- Click the User link on the left pane of the page. The User screen appears.
- Click the Search user link and select the first name of the user if you want to search for the user by first name from the Search by drop-down list box.
- Select a distributor or business unit from the Distributor/BU name drop-down list box.
- Select the status from the Status drop-down list box.
- Select a sort order from the Sort by drop-down list box.
- Click submit. The User search results screen appears listing all the users matching your search criteria.
- Click the User name link to open the Maintain user screen.
- Click the Maintain user bulk load link to open the Maintain user bulk load screen. The details like user name, pending uploads and failed uploads are displayed on the screen.
- Click the Search bulk load tasks. Type the file name in the File name field.
- Type the request date for the bulk load task in the Request date field. Alternatively, click the calendar icon and select a date.
- Select the status for the bulk load task from the Status drop-down list box.
- Select a sort order from the Sort by drop-down list box.
- Click cancel if you want to cancel the action you are performing on this screen and go back to the Maintain user screen.
- Click submit to search for the bulk load task based on the criteria.
Note: If you do not select any search criteria and click on submit all the files are displayed. If you select some search criteria and click on submit, search results based on your search criteria is displayed.
The following is a screen shot of the Manage user bulk load screen.
The search result section contains the following fields:
| Field name |
Function |
| File Name |
The list of files based on your search criteria. Click on the file name link to sort the file name in the ascending or descending order. |
| File Path |
The path for the corresponding file where it is stored. |
| Request Date |
The date when the corresponding file was requested. Click on the Request date link to sort the results in the ascending or descending order based on the request date. |
| Execution Date |
The date when the corresponding file was executed. Click on the Execution date to sort the results in the ascending or descending order based on the execution date. |
| Status |
The status of the corresponding file. |
| Error log file name |
The Error log file name for the corresponding file. |
Return to top